
8 Step Guide on How To Build a Sauna
Building a great sauna can be achieved with good forward planning, preparation and general building skills. Over the years our team have seen lots saunas which I would refer to as unconventional or just simply misinformed about sauna design and execution. While there are many different ways to build a good sauna, depending on who you listen to, but at Sauna HQ we follow the traditional Finnish method of building saunas. 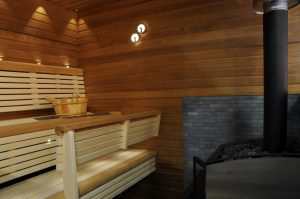
Step 1: Build your sauna framework in timber (not metal) to standard framing codes. Make sure studs are placed in every corner. The standard ceiling inside the sauna should be 2100mm. Create the ventilation for your sauna as required depending on your door position, type of heater and bench layout.
Step 2: Insulate the framework and sauna ceiling. Our preference is to use polyester insulation, but it does not matter too much what type or rating of insulation is used.
Step 3: Wrap the sauna interior with aluminium foil, silverside facing into the sauna. We take the extra step of taping all the joints with aluminium tape.
Step 4: Batten the sauna walls and ceiling which provides a very important air barrier between the foil and sauna cladding. The battens also allow extra support for the ends of the benches and wall mounted sauna heaters. 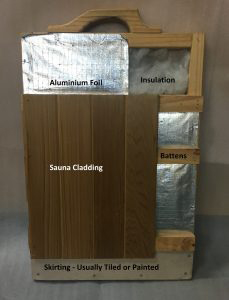
Step 5: Clad the interior of the sauna with your selected softwood timber. Finish off all internal corners with beads for a neat clean finish. Cut in vents as required and pull through lighting, heater supply and thermostat sensor cables as needed.
Step 6: Build your sauna benches and fix into place. Our method is to build suspended benches fixed to wall cleats and using supporting legs for spans greater than 2100mm. Open benches are always more suitable in sauna than boxed in closed benches which limit air flow.
Step 7: Hang your sauna door and fit the door hardware. Sauna doors need to open outwards and it is recommended to have a window in the sauna door.
Step 8: Install your sauna heater and lighting. Load the sauna rocks into the sauna heater and get ready to enjoy many hours of relaxation.
Once the basics to the sauna are finished you can decide if you want to add extra finishing details like back rests, bench infills, duckboard floor mats and heater guard rails.
If you need more detailed information specific to your project our Consultation Services are available in the shop or contact Sauna HQ and we can prepare a DIY Sauna Builders Package with all the sauna materials supplied along with detailed building guidelines customised for your sauna project.
